I was going to set up PiHole for a friend. Since she has an old Netbook available, I think why not using it. This sounds logical right? It would be if most distros are not 64bit only in their latest version. Also, I am looking for something small and lightweight.
At the end, I picked Linux Lite (https://www.linuxliteos.com/). Their Series 3 is still available in 32bit and because it is based on Ubuntu LTS, it is still in support till 2021.
Linux and PiHole installation is pretty standard and straightforward.
If you have issue to access the PiHole, you may want to check the firewall setting in Linux Lite. Also, it is worth to check the power saving option too to ensure the computer won't got to sleep.
Saturday, October 12, 2019

Saturday, September 28, 2019
EdgeRouter X VLAN and Firewall Rule Sets
One of the reasons you want to use VLAN is to segregate your network and to control traffics from one network to another. This post is just about this.
One of the issue I have is the direction in a ruleset As I was trying to limit the incoming traffics to an interface, you would think the direction should be IN. Oddly, the direction is actually OUT.

In this example, I have a VLAN 100 and would like to accept traffics from VLAN 1 and 2 into this network, but to restrict the access from it to VLAN 1 and 2.
To do this, I set the default action of this rule to DROP, and then added three rulesets to grant the permitted traffics.
The first rule is a general rule which allows any traffics from this VLAN to connect to the internet.
For this, I created a ruleset, and set its action to ACCEPT, and allowed all protocols. Then, on the advanced tab, I selected the states ESTABLISHED AND RELATED.
The second rule is a specific rule allowing VLAN 1 traffics to enter into this network.
For this, I created a ruleset, and set its action to ACCEPT, and allowed all protocols. Then, on the advanced tab, I selected the states ESTABLISHED AND RELATED (you may also need NEW). One extra is required for this ruleset, and it is specifying its source! on the source tab, I picked VLAN 1 from Network Interface dropdown box (or specifying the VLAN 1 IP, e.g. 192.168.1.0/24). I applied similar steps for VLAN 2.
After all of these, VLAN 100 should be able to accept traffics from VLAN 1, and 2, and be able to talk to the WAN. However it should not be able to access network resources in VLAN 1 and 2.
Above is based on this tutorial video I found on YouTube.
One of the issue I have is the direction in a ruleset As I was trying to limit the incoming traffics to an interface, you would think the direction should be IN. Oddly, the direction is actually OUT.

In this example, I have a VLAN 100 and would like to accept traffics from VLAN 1 and 2 into this network, but to restrict the access from it to VLAN 1 and 2.
To do this, I set the default action of this rule to DROP, and then added three rulesets to grant the permitted traffics.
The first rule is a general rule which allows any traffics from this VLAN to connect to the internet.
For this, I created a ruleset, and set its action to ACCEPT, and allowed all protocols. Then, on the advanced tab, I selected the states ESTABLISHED AND RELATED.
The second rule is a specific rule allowing VLAN 1 traffics to enter into this network.
For this, I created a ruleset, and set its action to ACCEPT, and allowed all protocols. Then, on the advanced tab, I selected the states ESTABLISHED AND RELATED (you may also need NEW). One extra is required for this ruleset, and it is specifying its source! on the source tab, I picked VLAN 1 from Network Interface dropdown box (or specifying the VLAN 1 IP, e.g. 192.168.1.0/24). I applied similar steps for VLAN 2.
After all of these, VLAN 100 should be able to accept traffics from VLAN 1, and 2, and be able to talk to the WAN. However it should not be able to access network resources in VLAN 1 and 2.
Above is based on this tutorial video I found on YouTube.
Wednesday, September 25, 2019
Problem connection to Samba Server
Today I have reinstalled Linux on a machine of mine, and configured it to use Samba to share a folder to the rest of my network.
However, when I tested my setup on a Windows machine, I got connection error. I have checked my setup and everything seems to be fine. At the end, it turns out nothing wrong with my setup as I can connect to this machine using IP. The problem is with my NetBIOS resolver.
My Linux machine IP is 133, but the IP reported when I ping it on my Windows machine is 113.


However, when I tested my setup on a Windows machine, I got connection error. I have checked my setup and everything seems to be fine. At the end, it turns out nothing wrong with my setup as I can connect to this machine using IP. The problem is with my NetBIOS resolver.
My Linux machine IP is 133, but the IP reported when I ping it on my Windows machine is 113.


If you have similar issue as i did, you may want to check your NetBIOS resolver too. The problem may be in your network rather than your setting.
n.b. To clear DNS caches under Ubuntu is:
sudo systemd-resolve --flush-caches
Saturday, September 14, 2019
Few Points of Setting up EdgeRuter X
Just want to share a few things I learnt while I was setting up my EdgeRouter X.
PVID is similar to UNTAGGED with other vendors, similar VID is as TAGGED.
Hence, with the example below, the router is configured as
eth1: VLAN 10
eth2: VLAN 20
eth3: VLAN 100
eth4: Truck port for VLAN10, VLAN20 and VLAN100
After setting up DHCP for each network, it needs to setup for DNS forwarding.

All fields in DHCP nees to be set. I made the mistake not filling in the Router and DHCP field. The router field is for the Gateway, and unlike other router which cannot be implied. Missing it would result Gateway detail omitted in connected clients and hence no internet access.

System wide DNS isn't set up in the System pane.

But rather using Config Tree

Personally, I prefer to use my choice of DNS provider than my Internet Provider's servers for stability and "privacy". For example, with my choice of DNS provider, NX is returned for NX for URL like below rather than Internet Provider's error page.
Last but not least, enable hardware offloading for NAT and IPSec to get the best out of the router.

PVID is similar to UNTAGGED with other vendors, similar VID is as TAGGED.
Hence, with the example below, the router is configured as
eth1: VLAN 10
eth2: VLAN 20
eth3: VLAN 100
eth4: Truck port for VLAN10, VLAN20 and VLAN100

After setting up DHCP for each network, it needs to setup for DNS forwarding.

All fields in DHCP nees to be set. I made the mistake not filling in the Router and DHCP field. The router field is for the Gateway, and unlike other router which cannot be implied. Missing it would result Gateway detail omitted in connected clients and hence no internet access.

System wide DNS isn't set up in the System pane.
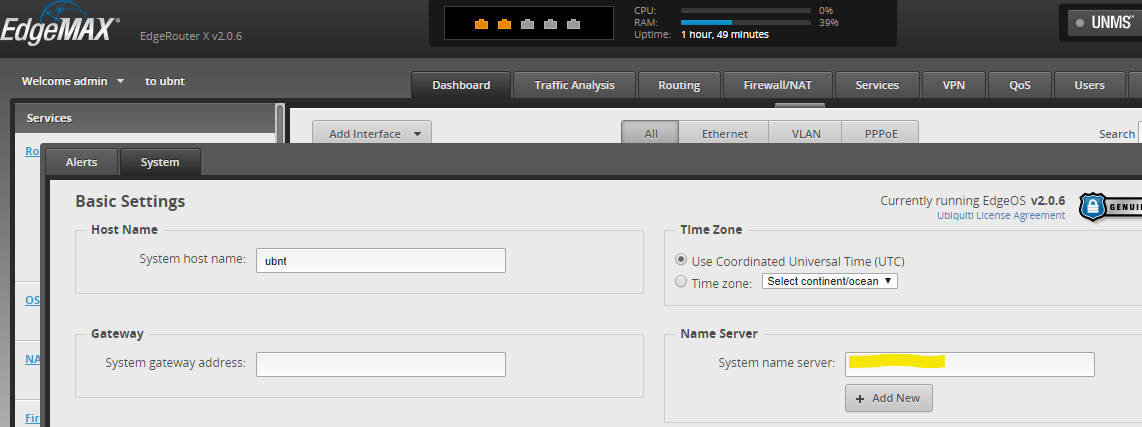
But rather using Config Tree

Personally, I prefer to use my choice of DNS provider than my Internet Provider's servers for stability and "privacy". For example, with my choice of DNS provider, NX is returned for NX for URL like below rather than Internet Provider's error page.
nslookup www.jkjkjlkjlkjlkjl.com
*** UnKnown can't find www.jkjkjlkjlkjlkjl.com: Non-existent domain
Last but not least, enable hardware offloading for NAT and IPSec to get the best out of the router.

Sunday, July 14, 2019
EdgeRouter X VLAN Awared Switch Setup
After managed to setup my EdgeRouter X (ER-X) as a VLAN awared switch, I want to make a few notes on things I have learnt.
1. For the trunk port, set the VID field with VLAN IDs it handles (tagged). In my setup, eth0 is my trunk port and it allows VLAN ID 1, 10, 20 and 100 to pass-through.
2. For VLAN port (un-tagged), put the desired VLAN ID in the PVID field (see example below)
3. Last but not least, it may worthwhile to tick the "Use non-default VLAN for management" option, and set the VLAN ID to the VLAN which you would like to be used as your management network while using the wizard to setting up the ER-X. This allows you to get back to the ER-X later if you wish to change its settings later.


1. For the trunk port, set the VID field with VLAN IDs it handles (tagged). In my setup, eth0 is my trunk port and it allows VLAN ID 1, 10, 20 and 100 to pass-through.
2. For VLAN port (un-tagged), put the desired VLAN ID in the PVID field (see example below)
3. Last but not least, it may worthwhile to tick the "Use non-default VLAN for management" option, and set the VLAN ID to the VLAN which you would like to be used as your management network while using the wizard to setting up the ER-X. This allows you to get back to the ER-X later if you wish to change its settings later.


Tuesday, July 2, 2019
Mint Linux Firefox scrollbar fix
Part of the reason I have moved away from Firefox is because of its scrollbar issue in Linux.
Ever since GTK 3 (or earlier), scrollbar in Firefox goes to when you click rather than jump a page when you click on its blank area. This is very annoying when you are reading an article and you are not equipped with a mouse with a scroll wheel.
Anyway, the fix is quite simple. You just need to add the below to ~/.config/gtk-3.0/settings.ini
[Settings]If the file doesn't exist, you just create it, i.e. touch ~/.config/gtk-3.0/settings.ini
gtk-primary-button-warps-slider=0
Tuesday, June 18, 2019
PiShrink, Move from a large SD card to a smaller SD Card
Initially my Raspberry Pi was using a 32GB SD Card for its Raspbian installation. Since the device is only using for testing, it is a bit of a waste to run the OS on a large SD card. Hence, I am looking for a solution to clone the disk to a smaller SD Card. At the end, I found this nice little script called PiShrink from this blog, https://community.octoprint.org/t/pishrink-an-sd-card-backup/1791
The steps are very simple. You first create an image file from your SD Card. You can use good old dd command or like myself use the Disks utility comes with my Mint Linux Cinnamon installation. Then you run the script against your image. Finally, you restore your image back to the smaller disk with your favorite imaging tool such as dd or Disks.
Here is an example of using PiShrink
wget https://raw.githubusercontent.com/Drewsif/PiShrink/master/pishrink.sh
chmod +x pishrink.sh
sudo ./pishrink.sh raspbian_full.img
Subscribe to:
Posts (Atom)