This is a little script I use for batch converting ape files in a folder into flac.
#!/bin/bash
for f in *.ape
do
mac "$f" "${f%.*ape}.wav" -d && flac --best "${f%.*ape}.wav" && rm "${f%.*ape}.wav"
done
This is a little script I use for batch converting ape files in a folder into flac.
#!/bin/bash
for f in *.ape
do
mac "$f" "${f%.*ape}.wav" -d && flac --best "${f%.*ape}.wav" && rm "${f%.*ape}.wav"
done
I choose an Android One phone for its better support and cleaner launcher. It is all good except one thing and that is Music Player. The default Google Music player isn't great but passable. Playlist is good but personally I prefer using folder for grouping.
The player isn't great but at least it is there to use, but now Google has decided ot take this away and replaced it with Youtube Music. It is all good if you only use streaming services for your music. However for people like myself who only play music off from my local collection, this action from Google is simple appaulling.
Anyway, if you are in the same boat like myself, you may want to give AIMP (https://play.google.com/store/apps/details?id=com.aimp.player&hl=en_GB&gl=US) a try. It is a nice free alternative with no ads.
Although without Google Music, there are many options available at the play store. Still, I think it is a bad decision to take away a basic music player.
Although there is an OEM version of OpenWRT (FriendlyWRT) for NanoPi R2S, personally I prefer using the original version of OpenWRT if it is possible. The FriendlyWRT is fine solution however it is few versions behind the official OpenWRT build. In addition, the OEM version preloaded with many plugins that I either don't use or I don't know. For instance, it comes it with many VPN related plugins that are populate in its home market.
Currently, its support hasn't make to the mainstream yet. It is still under development and its image is under the snapshot branch. Being a snapshot image, it only contains the very core. That is it doesn't come with luci preloaded. Here are steps that I use to set mine up. Firstly, ssh into your NanoPi, then:-
1) Install luci to regain GUI access.
opkg update
opkg install luci
2) Install packges for OpenVPN, Custom Command and ttyd.
opkg install openvpn-openssl luci-app-openvpn luci-app-commands luci-app-ttyd
3) Install packages for statistics such as CPU load, thermal etc
opkg install luci-app-statistics
opkg install collectd-mod-cpu collectd-mod-interface collectd-mod-memory collectd-mod-ping collectd-mod-rrdtool collectd-mod-wireless collectd-mod-thermal
4) Install Smart Queue Management (SQM) package
opkg install luci-app-sqm
You may need to restart the r2s to get this to work.
https://openwrt.org/docs/guide-user/luci/luci_app_statistics

Here is settings for the front LEDs in the /etc/config/system file.
config led 'led_wan'
        option name 'WAN'
        option sysfs 'nanopi-r2s:green:wan'
        option trigger 'netdev'
        option mode 'link tx rx'
        option dev 'eth0'

config led 'led_lan'
        option name 'LAN'
        option sysfs 'nanopi-r2s:green:lan'
        option trigger 'netdev'
        option mode 'link tx rx'
        option dev 'eth1'
n.b. all packages in one command:
opkg install luci openvpn-openssl luci-app-openvpn luci-app-commands luci-app-ttyd luci-app-statistics collectd-mod-cpu collectd-mod-interface collectd-mod-memory collectd-mod-ping collectd-mod-rrdtool collectd-mod-wireless collectd-mod-thermal luci-app-sqm
VPN Unlimited has a great step by step guide ( https://www.vpnunlimitedapp.com/help/manuals/open-wrt-wireguard-setup) for setting up Wireguard on OpenWRT.
Here, I just want to add a few useful notes on setting up Wireguard.
First, these are packages required to make Wireguard working.

Second, you may need to restart the Wireguard interface to see settings being applied. Sometimes you may even need to reboot the router.
Last but not the least, it is possible to have one local network using the normal WAN interface, and another network to use WG interface/ OpenVPN TUN Interface. You can do it by using VPN and WAN Policy-Based Routing (luci-app-vpn-policy-routing).
As below, you can specify the routing path for a machine, a group of machines or a network.
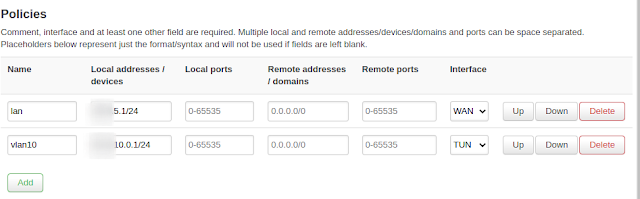
It is worth to note that, the policy routing only works if no NAT offloading is deployed.

Again, you may need to do a restart before you can see things become effective.
Two days ago, I updated my OPNSense to version 20.7.2. Then I started experiencing issue with my connection. My connection would cut off after a few hours and I could not get onto the firewall. Luckily, I have a backup of my configuration so reinstalling the firewall should not be a big problem.
Now, I have this issue of bring the firewall up to date. If I use the standard method to update the firewall, it will update it to the latest version, i.e. 20.7.2 which is the version I had problems with. Hence, I need a way to bring my firewall to the last good version, e.g. 20.7.1.
After consulting the know-it-all Google, here is what I found. On the firmware settings page, rather than using the default flavor, choose "(other)". In the box underneath, specify the version you want to update to, e.g.
<major version>/MINT/<decimal version number>/OpenSSL
20.7/MINT/20.7.1/OpenSSL
Save the settings, and then press the "Check For Update" button as usual. You now should get an update offer to the version you specified.
I hope I don't need to do this again in the future, but I guess this is something good to know.
I just want to share a few useful websites for AdBlock testing.
Just want to list a few public DNS providers I tend to use for my setups.
For unfiltered DNS service, I tend to use Google (8.8.8.8, 8.8.4.4), Cloudflare (1.1.1.1), NextDNS (45.90.28.155, 45.90.30.155), dns.sb (185.222.222.222, 185.184.222.222) for DNS over TLS. I was using DNS.WATCH (84.200.69.80, 84.200.70.40) before moved to DoT. DNS.WATCH is a nice alternative if you are looking for an option that is not from usual big providers.
Lastly, I uses DNSForge.de, a small DNS provider, if I need DNS with AdBlocking service. DNSForge uses PiHole to do AdBlocking. I use them over the others because they publish their blocklist on their site so I can determine what are blocked.

uci set network.lan.ipaddr='new-ip-address' (“new-ip-address” is the new IP address you want for the LEDE device in your network, e.g. 192.168.100.2) and press Return, uci commit && service network restart and press Return 


@echo off
SET interface="Ethernet 2"
SET staticip="192.168.1.10"
SET vpnip="192.168.100.10"
SET vpngateway="192.168.100.2"

REM Quad9 DNS
SET dns1="9.9.9.11"
SET dns2="149.112.112.11"

REM dnsforge.de DNS for Ad Blcoking
SET dnsab1="176.9.93.198"
SET dnsab2="176.9.1.117"

:begin
netsh interface ip show config name=%interface%
:options
echo.
echo Select a task:
echo =============
echo -
echo 1) Pi-Hole DNS
echo 2) DHCP DNS
echo 3) VPN
echo 4) VPN (With adblock)
echo 5) Static IP %staticip%
echo 6) Default (DHCP)
echo 7) Show Config for All Interfaces
echo 10) Exit
echo -
set /p op=Type option:
if "%op%"=="1" goto pihole
if "%op%"=="2" goto dhcpdns
if "%op%"=="3" goto vpn
if "%op%"=="4" goto vpnab
if "%op%"=="5" goto staticip
if "%op%"=="6" goto dhcpip
if "%op%"=="7" goto allconfig
if "%op%"=="10" goto exit

echo Please Pick an option:
goto begin


:pihole
echo Set to use Pi-Hole DNS
netsh interface ip set dns name=%interface% source=static address=10.0.100.2
goto begin

:dhcpdns
echo Set to use DHCP DNS
netsh interface ip set dns name=%interface% dhcp
goto begin

:staticip
echo Set to use DHCP DNS
netsh interface ip set address name=%interface% static %staticip%
goto begin

:vpn
echo Set static IP to %vpnip%
netsh interface ip set address source=static name=%interface% address=%vpnip% mask=255.255.255.0 gateway=%vpngateway% gwmetric=0
netsh interface ip set dns name=%interface% source=static %dns1%
netsh interface ip add dns name=%interface% %dns2% index=2
goto begin

:vpnab
echo Set static IP to %vpnip%
netsh interface ip set address source=static name=%interface% address=%vpnip% mask=255.255.255.0 gateway=%vpngateway% gwmetric=0
netsh interface ip set dns name=%interface% source=static %dnsab1%
netsh interface ip add dns name=%interface% %dnsab2% index=2
goto begin

:dhcpip
echo Set to use DHCP DNS
netsh interface ip set address name=%interface% dhcp
netsh interface ip set dns name=%interface% dhcp
goto begin

:allconfig
netsh interface ip show config
goto options

:exit
@exit

